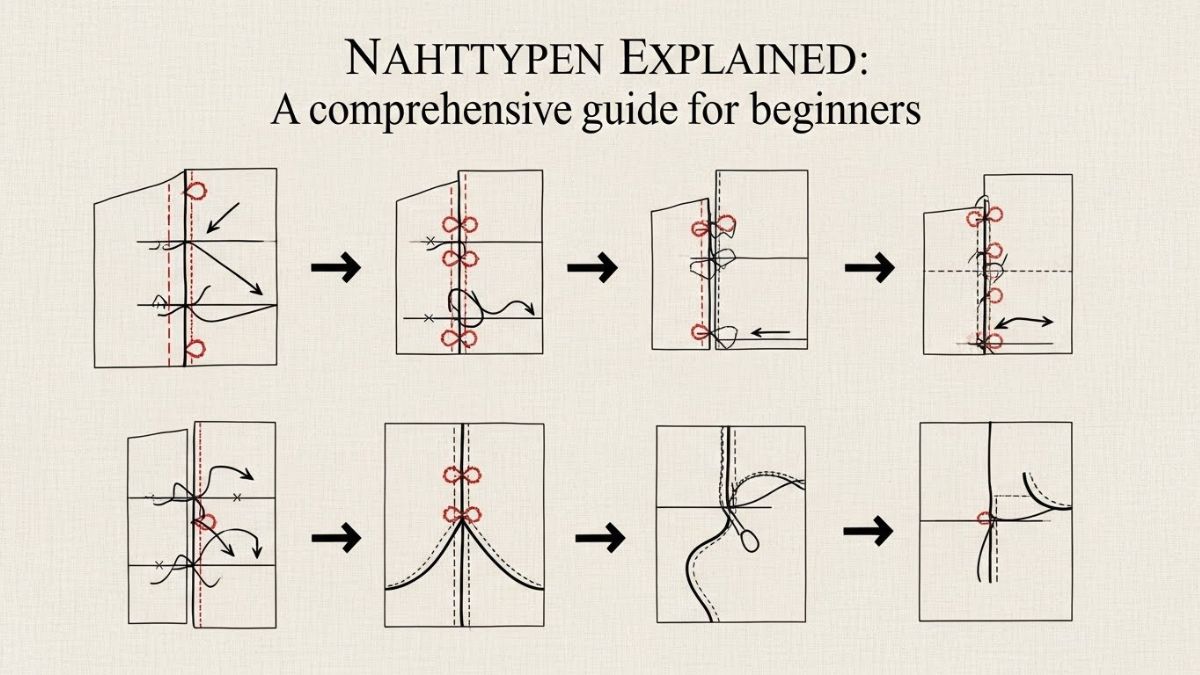
When it comes to sewing, understanding the different nahttypen can feel like navigating a labyrinth. With so many options available, from straight stitches to zigzag patterns, beginners often find themselves overwhelmed. Fear not! This comprehensive guide will break down the various types of stitching and help you become confident in choosing and using them for your projects.
Whether you’re mending clothes or crafting something entirely new, knowing which nahttyp to use makes all the difference. Not only does it influence the durability of your work, but it also affects its overall appearance. Dive into this world of stitches with us as we explore their benefits, uses, and how you can select the right one for any creative endeavor. Let’s get started on this stitch exploration journey!
Benefits and Uses of Nahttypen
Nahttypen offer a multitude of benefits that can enhance any sewing project. They provide strength and durability, ensuring your seams hold up over time. This is particularly important for garments subjected to frequent wear or stress.
Different nahttypen serve various purposes. For instance, a straight stitch is ideal for basic seams, while zigzag stitches allow for stretch in knit fabrics. Understanding these variations expands your creative potential.
Using the right nahttypen also contributes to professional-looking results. It allows you to achieve cleaner edges and prevents fraying in fabric projects. This attention to detail can elevate the quality of handmade items.
In addition, certain nahttypen are designed specifically for special materials like leather or denim. These specialized options make it easier to work with challenging textiles without compromising structural integrity. Each choice plays a significant role in achieving desired outcomes in your crafting endeavors.
How to Choose the Right Nahttypen for Your Project
Choosing the right nahttypen is crucial for your sewing projects. Start by considering the fabric type you’ll be using. Different fabrics require specific stitches to ensure durability and appearance.
Next, think about the purpose of your project. A clothing item might need a stretch stitch, while home décor items can benefit from decorative stitches. Understanding functionality will guide your choice effectively.
Also, consider the thickness of your material. Heavier fabrics often necessitate a stronger stitch than lighter ones. Look for recommendations based on weight and usage.
Don’t overlook personal preference! Experimenting with various nahttypen can help you discover what works best for you and enhances your creativity in every project.
Step-by-Step Guide on Using a Nahttypen
Using a nahttypen is straightforward once you grasp the basics. Start by gathering your materials: fabric, thread, and of course, your chosen nahttypen.
Begin with preparing your fabric. Ensure it’s clean and ironed for smooth sewing. This step helps prevent any unwanted creases during stitching.
Next, thread the nahttypen according to its specific design. Each type may have different threading methods, so take a moment to read instructions if needed.
Now position the fabric under the needle. Align it carefully based on your project requirements; precision here matters greatly.
As you begin sewing, maintain an even pace. Avoid rushing through this process; patience will yield better results.
After completing your stitches, check for consistency in tension and stitch length. Any adjustments can be made right away before moving forward with finishing touches like cutting threads or adding embellishments.
Common Mistakes to Avoid When Using Nahttypen
When working with nahttypen, one common mistake is not pre-washing your fabric. This can lead to puckering or distortion after the first wash, ruining your hard work.
Another pitfall is choosing the wrong thread type. Not all threads are suitable for every project. Using a heavy thread on delicate fabrics can create tension issues and uneven seams.
Many beginners overlook seam allowances as well. Cutting too close to the edge can cause fraying. Ensure you stick to recommended measurements for each nahttypen.
Also, don’t rush through your stitches! Take time to sew slowly and steadily; this improves accuracy and overall quality of the finished product.
Failing to test stitch settings on scraps before committing them to your main project can result in costly errors. Always take a moment for testing—it saves time in the long run!
Tips for Maintaining and Cleaning Your Nahttypen
Keeping your nahttypen in top shape is essential for optimal performance. Regular care can extend its lifespan significantly.
Start by wiping down the surface after each use. A soft cloth will do wonders to remove dust and residue. Avoid abrasive materials that could scratch the finish.
For deeper cleaning, use a gentle soap solution. Dampen a cloth with it and carefully clean intricate areas where dirt might accumulate. Ensure no moisture lingers to prevent rust or corrosion.
Inspect your nahttypen periodically for any signs of wear or damage. Addressing small issues early can save you from bigger problems later on.
Store your nahttypen in a dry place, ideally in its original packaging or a protective case. This minimizes exposure to elements that could cause deterioration over time.
Familiarize yourself with the manufacturer’s recommendations for maintenance. Following these guidelines ensures you get the most out of your investment.
Conclusion
Nahttypen play a pivotal role in various sewing and crafting projects. Understanding the different types of nahttypen can elevate your work, ensuring durability and aesthetics. By selecting the right type for each task, you enhance both functionality and design.
With proper techniques, common pitfalls can be avoided. Regular maintenance will keep your tools in top shape, allowing for smoother projects ahead.
Embrace the world of nahttypen with confidence. Whether you’re a novice or experienced crafter, mastering these concepts can transform your creative journey into something truly remarkable. Happy crafting!